If you’re our superuser you probably noticed you have an option to create a public page of your tests.
To make this functionality more interactive and custom, we created a possibility to add a widget wherever you want with the realtime uptime chart.
Adding a widget to your site is really simple, and if you have a opportunity to create a <script> tag to your website, you’ll definitely handle it without any problems.
Step 1 – create a public uptime monitoring page
First thing you need to do is create a public uptime monitoring page. To do that, simply click on the yellow “create hash” button, next to a test name.

When you clicked the button, a new hash is created and now you have access to two different buttons: public page and reset.

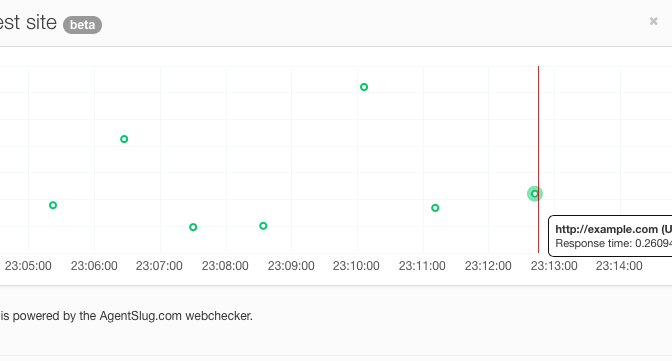
Public page is a public link with a realtime uptime monitoring chart. Anytime our robot access your site and report the uptime status, you’ll see a green dot on a chart.
If you hover the dot, you’ll also get an information about the single test proceeded

Remember the page is as public in a same way as your dropbox share links. It is not protected by password or your account session. Anyone who knows the link, can access the site.
If you’d like change the link, you can always do that clicking the “reset” button on a tests list.
Step 2 – copy the secret part
Your new public realtime page URL looks similar to this one:
http://agentslug.com/public/realtime/d5ffc4218f/104
Now, write down (copy) two last parts of the URL. You’ll need it for widget configuration.
For this example, we need to copy this: “d5ffc4218f/104”
Step 3 – insert a <script> to your site.
Now it’s time for the last step. Simply copy the html below and paste it wherever you want (for example on you blog sidebar, just like we did here).
<div id=”uptime_graph” data-title=” ” data-hash=”d5ffc4218f/104″></div>
<script src=”http://agentslug.com/ps/realtime_widget.js” data-target=”uptime_graph”></script>
The only thing you need to customize to make it work for your test is to change the “data-hash” attribute. Paste there the two last one parts of the URL you copied on step 2.
You can also change the “data-title” attribute. If you leave it empty, there will be no title at all (just the chart and your logo), just like we did on this blog.
I’m a web developer, how to customize it
If you’re a web developer, you probably need to customize it.
You can do it both way:
By configuration
The script has basic configuration options. You can change the title (see above) and height of the iframe which displays the widget (default is 300px, max is 500px).
By making your own javascript
If you like to, you can always make your own script, using our as an example.
Source code of the script, extended information can be found on our GitHub repository.